| View previous topic :: View next topic |
| Author |
Message |
trev
Jedi Master


Joined: 02 Feb 2006
Posts: 311
Location: Ireland
|
 Posted: Sat Apr 30, 2016 11:49 am Post subject: it's on! (AGAIN!) TDI upgrade in my diesel bay Posted: Sat Apr 30, 2016 11:49 am Post subject: it's on! (AGAIN!) TDI upgrade in my diesel bay |
 |
|
reposting a thread from my local VW club forum just to get this up to date here:
out with the old 1Y 1.9 non-turbo diesel and "2-litre" airc00led gearbox. They served me well, never missed a beat in 10,000 miles of use. The only maintenance required was checking the oil and coolant levels once in a while. Soon to be fitted up in another van for many more miles of hassle-free motoring!

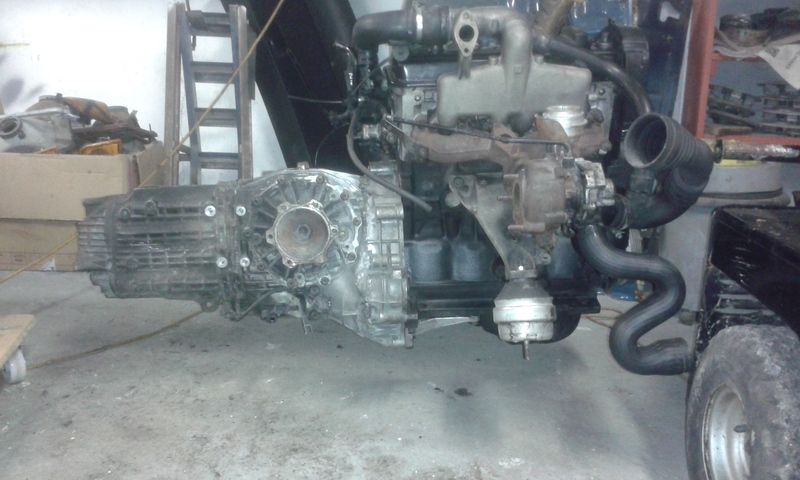
this is waiting in the wings to be offered up.
 |
|
| Back to top |
|
 |
trev
Jedi Master
Joined: 02 Feb 2006
Posts: 311
Location: Ireland
|
| Posted: Sat Apr 30, 2016 11:52 am Post subject: |
|
|
TDI rolled in underneath and the van lowered back down to earth. Time to start settling it in, measurements taken etc.

I measured the ground clearance under the outgoing subframe before I started any of this and it was 9". Incidentally, the subframe was about 2.5" lower than the sump so the 1Y sump was actually 11.5" off the ground! It NEVER caught on anything so as a starting point, I've set the TDI engine up to have 9" clearance below the sump too.
The engine has to be lower than before due to the outputs from the Passat gearbox being higher up now that it's upside-down and the bus CVs only allowing so much of an angle of movement. I have to keep within the comfortable range of the CVs at full droop of the rear suspension so I'm hoping I won't have to position the engine any lower than 9" to do so. Remains to be seen though.
In the pic the engine is propped from the ground and the van is riding high due to not having to carry any engine weight. Next step is to have it hanging in the van and then check/reset the 9" ground clearance with the suspension settled before starting to dream up the subframe design. |
|
| Back to top |
|
|
trev
Jedi Master
Joined: 02 Feb 2006
Posts: 311
Location: Ireland
|
| Posted: Sat Apr 30, 2016 11:54 am Post subject: |
|
|
| Quote: | | 9" of clearance under the sump |
that didn't last long! The minute I offered up the drive shafts to see how close/far from the ideal position they were I could see that 9" below the sump had the gearbox outputs waaay to high. After an evening of fluting about with a measuring tape, a jack, various blocks of wood and axle stands, I have 7" below the sump and I think an acceptable drive shaft angle.
I'm going to do a bit of experimenting with a selection of FWD drive shafts I have here. Wouldn't it be fierce handy if one of them was the correct length? As far as I can see, FWD CV joints have way better range of movement than the RWD bus ones. I've read that the 411/412 CV joints fit right up to the bus drive shafts and give something likr 1-2 degrees of extra articulation. It may be al I need to regain a bit more clearance under the sump!
hard to spot the difference between this pic and the last one but here the van is now carrying the weight of the engine and the ground clearance has been reduced...
 |
|
| Back to top |
|
|
trev
Jedi Master
Joined: 02 Feb 2006
Posts: 311
Location: Ireland
|
| Posted: Sat Apr 30, 2016 11:55 am Post subject: |
|
|
I bought the steel for the CV joint adapters a while back, it was an offcut from a larger sheet and I picked it up for pennies at the local steel stockists. I spent about an hour and three skinny disks cutting it down to two rough octagons that I could bring to work and turn into adapters over a few lunch breaks. I got one of the adapters finished today, it only took 2.5 hrs between marking out carefully, drilling, tapping, turning on the lathe etc. And that's just one of them!! I'll get started on the other one next week.
 |
|
| Back to top |
|
|
trev
Jedi Master
Joined: 02 Feb 2006
Posts: 311
Location: Ireland
|
| Posted: Sat Apr 30, 2016 11:58 am Post subject: |
|
|

having the second CV adapter made allowed me to centre up the gearbox and set the height of the CVs. After surveying a few bay window bus owners who were kind enough to crawl under their vans with measuring tapes on my behalf, I decided that 370mm from the ground would be a pretty happy place for the CV joints. It gives me 7.5" of clearance under the sump and a touch over 7" under the gearbox bellhousing. Grand.

incidentally, I'm using 100mm B4 Passat inner CV joints on both ends of the bay window drive shaft. They're 34mm wide, same as the Porsche 944 CVs, which are reputed to give more angle than the stock bus CVs. For reference, the stock bus CVs are 32mm wide. So I'm hoping they'll work out just as well as the Porsche ones at half the price. Remains to be seen once I get the bus moving under its own steam.
onwards to the engine mount brackets: With the gearbox centred and the CV height set, the engine propped at the right height and the van winched down onto it I could start making the engine mount brackets. It started with a flat plate bolted to the stock chassis rail points, deliberately too long to allow for wherever the bracket ended up. I can cut it to length afterwards. Then some careful measurements and cutting the 75mmx 100mm angle to length and welding it to the plate. Repeat for the opposite side. The next hurdle to overcome is the fact that once the props are removed, the engine's weight causes the plates to splay outwards a little. Only 5mm or so but that's a twisting stress on the chassis rails that they weren't designed for so I'll have to add in a tie-bar of sorts to link the two plates together and stop them from splaying. That's tomorrow's job.


after that it's the front gearbox mount. The conventional thing to do is the nose-cone mount onto the torsion bar. I might do that yet but first I want to see how feasible it would be to use the two side-mounts the gearbox used in the Passat. It might be a non-runner but I'll check it out first...
AND THAT'S IT UP TO DATE! |
|
| Back to top |
|
|
splitbusvanatic
Jedi Master
Joined: 08 Oct 2006
Posts: 330
Location: Co. Mayo, Ireland
|
| Posted: Sun May 01, 2016 8:47 am Post subject: |
|
|
Nice update Trev.
Interesting about the b4 Passat inner cv's.
You're drawing from your own lineage of VW ownership there.
I like it.
Be cool to see if you can use the TDi G'box's own mounts.
I didn't get any with my box.
I used the t25 rear mount.
Picked up the holes on the rearmost face of the end of the box. |
|
| Back to top |
|
|
trev
Jedi Master
Joined: 02 Feb 2006
Posts: 311
Location: Ireland
|
| Posted: Sun May 01, 2016 7:38 pm Post subject: |
|
|
the B4 CVs are the same diameter as the Porsche ones, 100mm, same thickness, 34mm but the ball size is 19mm as opposed to 17mm of the Porsche CVs. I'm hoping it's the width of the CV and not the ball size that gives the Porsche ones the extra flex.
Saying that, I think my CV height/drive shaft angle is still within the safe range even of stock bus CVs even though I'm using the Passat ones. I asked a few mates with bays to measure the heights of their CVs and one chap with a TDI bay has his at 390mm from the ground on stock bus CVs and reports no problems. His van has been TDI'd for a couple of years now with no shortage of miles done. |
|
| Back to top |
|
|
Wilfred
Darth Admin

Joined: 13 Nov 2013
Posts: 366
|
|
| Back to top |
|
|
trev
Jedi Master
Joined: 02 Feb 2006
Posts: 311
Location: Ireland
|
| Posted: Mon May 09, 2016 5:23 pm Post subject: |
|
|
I didn't bother with the two side mounts on the gearbox, it looked like too much fabrication and possible interference with the semi-trailing arms so I went with the conventional nose-cone mount on the gearbox, more on that tomorrow. Tonight's update is the cable shift conversion on the gearbox. It's only at prototype stage, it needs to be beefed up a bit and tidied up a lot but the concept has been proven.
The long diagonal bar that does the fore/aft movement is way too flimsy and bends quite a bit making for clumsy changes but once remade in a stronger bar, it'll be a winner!
the vertical rod operates the side-to-side movement from the gear lever. Once all the bits have been finalised, I'll have to measure up and have the cables lengthened. I've used a local-ish cable manufacturing company before to good effect, I'm sure they'll be able to help again.


https://www.youtube.com/watch?v=3gsc0Ei3jTg |
|
| Back to top |
|
|
trev
Jedi Master
Joined: 02 Feb 2006
Posts: 311
Location: Ireland
|
|
| Back to top |
|
|
trev
Jedi Master
Joined: 02 Feb 2006
Posts: 311
Location: Ireland
|
| Posted: Wed Jun 15, 2016 7:39 pm Post subject: |
|
|
this looks like fcuk all but took a good bit of head scratching, measuring, trial and error, sleeping on it etc! With a conversion like this you find yourself reinventing the wheel at every turn.

It's the original clutch master cylinder off the A4, a reservoir from an Almera, the original clutch pedal lever from the van but with a small extra crank welded on the top, a spherical or "Rose" joint I bought for another project but never used, a brass hex M8-M6 adapter I made on the lathe and as usual, a lump of scrap metal. Thing is, I didn't want to cut or weld to the van so I used a pair of stock drillings in the chassis leg to mount the bracket to and the Rose joint was used to overcome the difference in the direction of travel of the clutch lever and the direction of action of the master cylinder. Just have the hard pipe down to the back of the van to make now, fill up the system, bleed it and it's good to go. The reservoir will be hidden by the kick panel once it's installed again.


 |
|
| Back to top |
|
|
Wilfred
Darth Admin
Joined: 13 Nov 2013
Posts: 366
|
| Posted: Wed Jun 15, 2016 9:10 pm Post subject: |
|
|
Hey! nice work.
looks better than my solution. Only question I have: Do you fully press and release the clutch cilinder?
Bleeding the system was a pain for me, cause the master cilinder is upside down on the gearbox. Be prepared for it to take time!
_________________
1973 BayWindow running 1.9 110 bhp TDI with flipped gearbox. |
|
| Back to top |
|
|
|


 FAQ
FAQ Search
 Memberlist
 Usergroups
 Register
 Profile
 Log in to check your private messages
 Log in


